The enchanting flicker of a wood-burning fire pit can transform any backyard into a cozy retreat, offering warmth, light, and an irresistible ambiance. Beyond simply gathering around, many aspire to harness that primitive flame for culinary adventures, infusing dishes with unique smoky flavors impossible to replicate indoors. However, the art of cooking over an open fire, especially a wood-burning one at home, demands a thorough understanding of safety and technique. Without proper precautions and knowledge, a delightful evening can quickly turn hazardous, or your gourmet aspirations might end in charred disappointment. This comprehensive guide will equip you with the essential expertise to cook safely and successfully over your wood-burning fire pit, ensuring every meal is a memorable triumph.
The Allure of Wood-Burning Fire Pit Cooking
A wood-burning fire pit is more than just a garden feature; it’s a dynamic hub for outdoor living. It provides a natural focal point for social gatherings, extends usable outdoor time into cooler evenings, and creates an undeniably rustic charm. For the culinary enthusiast, it unlocks a world of flavor, imparting a depth and smokiness to food that gas grills simply can’t match. Imagine perfectly seared steaks with a rich char, slow-roasted vegetables imbued with earthy notes, or even freshly baked bread cooked directly in the embers. The primal connection to cooking over an open flame is deeply satisfying, turning a simple meal into an engaging experience. Yet, with this primitive power comes great responsibility. Ensuring safety is not just a recommendation but a paramount requirement to enjoy these benefits without incident.
Essential Safety Measures for Fire Pit Cooking
Cooking over a wood-burning fire pit introduces unique challenges, making safety protocols absolutely critical. Adhering to these guidelines will protect your home, your loved ones, and ensure your culinary efforts are enjoyable and risk-free.
Site Selection and Preparation
|
Our Picks for the Best Fire Pit in 2026
As an Amazon Associate I earn from qualifying purchases.
|
||
| Num | Product | Action |
|---|---|---|
| 1 | Kingson 26" Outdoor Fire Pit with Grill & Mesh Cover, Wood Burning Steel Firepit with Poker & Star Spark Screen, Heavy Duty Patio Fire Bowl for Backyard, Camping & Garden |

|
| 2 | Fire Beauty Fire Pit for Outside Wood Burning,BBQ Grill Steel Fire Bowl with Spark Screen Cover,Log Grate,Poker for Camping Beach Bonfire Picnic Backyard Garden |
|
| 3 | Wisteria Lane 3 in 1 43" Extra Large Fire Pit for Outside Wood Burning with 2 Adjustable Grills, Outdoor Fireplace with Lid and Fire Poker, BBQ & Bonfire & Round Metal Table for Patio, Backyard |
|
| 4 | Fire Pit - 32-Inch Outdoor Wood Burning Firepit with Screen, Poker, and Cover - Outdoor Fire Pits for Backyard, Deck, or Patio by Pure Garden (Black) |
|
| 5 | SINGLYFIRE 36 Inch Fire Pits for Outside Large Outdoor Wood Burning Crossweave firepit Heavy Duty Steel Bronze Bonfire Pit for Patio Backyard Garden with BBQ Grate,Spark Screen,Log Grate,Poker |
|
| 6 | Fire Pit - 32-Inch Outdoor Wood Burning Firepit with Screen, Poker, and Cover - Outdoor Fire Pits for Backyard, Deck, or Patio by Pure Garden (Black) |
|
| 7 | BALI OUTDOORS Fire Pit with Poker, 32 inch Outdoor Fire Pit Patio, Wood Burning Firepits for Outside with Grill |
|
| 8 | CIAYS Smokeless Firepit, 19 Inch Fire Pit for Camping with Patented Technology, Portable Fire Pit for Outside with Steel Grill Rack, Fire Poker, and Bag, Easy Setup and Storage, Wood Burning |
|
| 9 | Fire Beauty 26" Steel Fire Pit with Grill & Diamond Mesh Design,360° Airflow Tech for 80% Less Smoke,XL Flames,Heavy-Duty Portable Outdoor Fire Bowl for Camping, Backyard, Beach (22lbs, 4 Handles) |
|
| 10 | HGD 20 Inch Smokeless Firepit with Grill, Portable Wood Burning Fire Pit for Camping & Backyard, Stainless Steel Outdoor Fireplace with Travel Bag, Easy Setup & Compact Storage - Foldable Design |
|
The location of your fire pit is the first and most vital safety consideration. Always choose a spot that is at least 10 feet away from any structures, including your house, fences, sheds, and overhanging trees or branches. This distance also applies to combustible materials like dry leaves, garden furniture, or even low-hanging string lights and power lines. Your fire pit should rest on a stable, level, and non-combustible surface such as concrete, gravel, or stone. Avoid placing it directly on wood decks or grassy areas unless a specific fire-proof base is used. Before lighting, always check local fire regulations and current weather conditions; strong winds can easily carry embers, dramatically increasing fire risk.
Fire Management and Extinguishing
Once your fire is lit, constant vigilance is key. Never leave a fire pit unattended, even for a moment, especially when children or pets are present. Designate a clear “safe zone” around the fire pit and ensure everyone, particularly curious youngsters and animals, understands to keep a safe distance. Absolutely avoid using lighter fluid, gasoline, or kerosene to start or fuel your fire; these highly volatile substances can cause dangerous flare-ups. For wood-burning pits, a sturdy metal spark screen is indispensable to contain embers and prevent them from escaping. Finally, before retiring for the night or leaving your backyard, ensure the fire is completely extinguished. This means no glowing embers or smoke. Douse the coals thoroughly with water or smother them with sand, stirring them to ensure every hot spot is cooled.
Personal Safety and Food Handling
Your personal protection and diligent food handling are equally important. When working near the flames or handling hot cooking grates and tools, heat-resistant gloves are non-negotiable – welding gloves are often recommended for their superior durability and protection. Always use long-handled tongs, spatulas, and pokers to keep a safe distance from the heat. A digital meat thermometer is your best friend for food safety, ensuring meats are cooked to proper internal temperatures to prevent foodborne illness. Prep all your food items, such as chopping vegetables and trimming meats, indoors before you even light the fire. Keep perishable ingredients in a cooler with ice until just before cooking, and use separate cutting boards and utensils for raw meats to prevent cross-contamination. Always ensure your cooking surfaces are clean before and after use.
Choosing the Right Wood for Culinary Excellence
The type of wood you use significantly impacts not only the fire’s performance but also the flavor imparted to your food and the amount of smoke produced. Making the right choice is fundamental to a pleasant and safe cooking experience.
Hardwood vs. Softwood
For fire pit cooking, hardwoods are unequivocally superior. Woods like oak, maple, hickory, apple, cherry, ash, and beech are dense, burn hotter and longer, produce less smoke, and create a more consistent bed of embers ideal for cooking. Their tight grain structure contributes to a cleaner burn and imparts desirable smoky flavors. Softwoods, such as pine, fir, or cedar, are generally not recommended for cooking. While they light easily and produce charming crackling sounds, they burn quickly, create excessive smoke (often resinous and bitter), and can leave unpleasant flavors on your food. They are best reserved for kindling or non-cooking fires.
The Importance of Seasoned Wood
Regardless of the species, seasoned wood is paramount. Seasoned wood refers to wood that has been properly dried, typically for six months to a year, reducing its moisture content to below 20%. Freshly cut, or “green,” wood contains a high percentage of water, making it difficult to light, producing copious amounts of acrid smoke, and burning inefficiently at a lower temperature. This excessive smoke can overwhelm your food’s flavor and irritate your eyes and lungs. You can identify seasoned wood by its grey, weathered exterior, lighter weight, and visible cracks at the ends. It should also produce a clear, hollow sound when two pieces are knocked together, rather than a dull thud.
Flavor Profiles of Different Woods
Different hardwoods offer distinct flavor profiles that can enhance your cooking:
- Oak: A classic choice, it provides a slow, steady burn and a robust, earthy smoke flavor that pairs well with beef, poultry, and hearty vegetables.
- Hickory: Known for its strong, distinctive smoky flavor, ideal for ribs, pork, and chicken. Use sparingly if you prefer a milder smoke.
- Maple: Offers a subtle, sweet smoke that complements pork, poultry, and vegetables beautifully.
- Apple & Cherry: These fruitwoods provide a mild, sweet, and fruity smoke that is excellent for poultry, fish, pork, and even baked goods.
- Ash: Burns well with good heat and a clean flame, offering a mild flavor that won’t overpower your food.
> “The secret to superior fire pit cooking lies not just in the flame, but in the embers. Master the embers, and you master the fire.” – Alex Stone, Outdoor Culinary Expert
Setting Up Your Fire Pit for Optimal Cooking
Beyond safety, a strategic setup will greatly enhance your fire pit cooking capabilities, allowing for better heat control and more consistent results.
Suitable Fire Pit Types and Accessories
While many fire pits are primarily decorative, those designed with cooking in mind offer distinct advantages. Look for pits that include built-in grill grates, or consider purchasing a heavy-duty, aftermarket grill grate specifically designed to fit over your pit. These grates provide a stable and elevated surface for cooking, keeping your food out of direct flames. Another versatile option is a cooking tripod with a hanging grate or pot hanger, which allows you to adjust the cooking height above the embers, providing excellent temperature control for various dishes, from searing to slow-simmering stews. Ensuring that any grill grate or cooking accessory is stable and securely positioned is crucial to prevent food from accidentally tumbling into the fire.
Building the Perfect Ember Bed
The golden rule of wood-burning fire pit cooking is to cook over hot coals and embers, not direct flames. Direct flames will quickly char the outside of your food while leaving the inside undercooked. Achieving the ideal cooking fire takes patience. Start your fire with kindling and smaller seasoned logs, allowing them to burn down for 30 to 60 minutes, or even longer, until you have a glowing bed of red-orange coals with minimal active flames. This ember bed provides consistent, radiant heat that cooks food evenly and imparts that desirable smoky flavor without burning it.
To create different heat zones within your fire pit, use a fire poker to arrange the hot coals: pile them higher on one side for a hotter zone, and spread them thinner on another for a cooler zone. This allows you to sear meats quickly over high heat and then move them to a cooler area to finish cooking slowly. You can gauge the heat by holding your hand about 8 inches above the embers: if you can only hold it there for 3-4 seconds, it’s a brisk, hot fire ready for searing. For lower heat, you might be able to hold your hand there for 6-8 seconds. Add small pieces of seasoned wood periodically to maintain your ember bed, rather than throwing on large logs that will produce excessive flames and smoke.
Essential Tools and Cookware for Your Outdoor Kitchen
Having the right equipment makes fire pit cooking safer, more efficient, and much more enjoyable. Think of these as your outdoor culinary arsenal.
Must-Have Fire Pit Tools
- Long-Handled Tongs, Spatulas, and Forks: These are indispensable for maneuvering food on the grill grate and adjusting logs or coals from a safe distance. Their length prevents burns and keeps you away from intense heat.
- Heat-Resistant Gloves: As mentioned, these are crucial. Look for sturdy, heavy-duty options, such as welding gloves, that offer substantial protection from radiant heat and accidental contact with hot surfaces.
- Digital Meat Thermometer: Non-negotiable for ensuring food safety and achieving perfect doneness, especially with larger cuts of meat.
- Fire Poker, Shovel, and Rake: Essential for managing your fire, stirring coals, moving logs, and cleaning out ash.
- Fire Extinguisher, Water Bucket, or Garden Hose: Keep one of these readily accessible at all times for immediate response to any accidental flare-ups or to extinguish the fire completely.
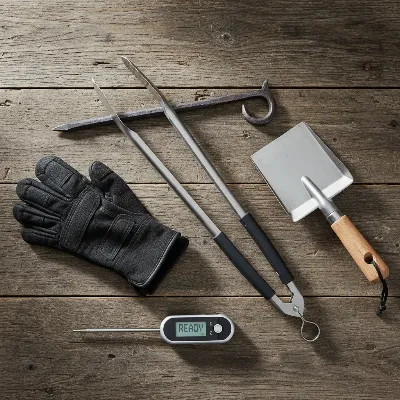 Essential tools for safe and effective fire pit cooking, including long tongs, heat-resistant gloves, and a meat thermometer.
Recommended Cookware
- Cast Iron Cookware: Skillets, Dutch ovens, and griddles made of cast iron are ideal for fire pit cooking. They retain and distribute heat exceptionally well, making them perfect for searing, frying, simmering stews, or even baking. Their rugged construction can withstand direct flame and high temperatures.
- Heavy-Duty Grill Grates: Even if your fire pit doesn’t come with one, investing in a robust stainless steel or cast iron grate is a game-changer. It provides a stable cooking surface and allows you to grill directly over the embers. Adjustable grates are particularly versatile as they allow for varying heights above the heat.
- Aluminum Foil: A simple yet incredibly versatile tool. Heavy-duty aluminum foil can be used to wrap vegetables, fish, or even entire meal packets for cooking directly in the coals, creating a steamy, flavorful result. It also aids in easy cleanup by lining cookware.
Mastering Cooking Techniques Over the Open Fire
Cooking over a wood-burning fire pit is an art that blends patience with technique. Once you have a stable ember bed and the right tools, you can experiment with various methods to create delicious outdoor meals.
Direct Grilling and Searing
This is the most common and straightforward technique, ideal for items that benefit from high heat and a good char. Place a grill grate directly over the hottest zone of your ember bed.
- Meats: Steaks, burgers, sausages, chicken pieces (with bones) can be grilled directly. Start them over the hottest part of the embers to achieve a beautiful sear and then move them to a slightly cooler zone to finish cooking through without burning.
- Vegetables: Bell peppers, zucchini, onions, asparagus, and corn on the cob (husked or in foil) grill wonderfully, developing sweet, smoky flavors and a pleasing char.
- Technique: Flip food regularly to ensure even cooking. Use your long tongs and meat thermometer liberally. Don’t crowd the grate, allowing enough space for air circulation and easy turning.
Indirect Cooking and Slow Roasting
For items that require longer cooking times, a more gentle heat, or a deeper infusion of smoke, indirect methods are best.
- Foil Packets: Wrap vegetables (potatoes, carrots, root vegetables), fish, or even diced chicken with herbs and a splash of liquid in heavy-duty aluminum foil packets. Place these packets directly within the hot embers or on the cooler side of the grill grate. The foil traps moisture and flavor, essentially steaming the food.
- Dutch Oven Cooking: A cast iron Dutch oven is perfect for slow-cooking stews, chili, baked beans, or even baking bread over the fire. You can place it directly on the cooler embers, or suspend it from a tripod. For baking, place hot coals on the lid as well to create an oven-like environment.
- Using Cooler Zones: For larger cuts of meat like roasts or whole chickens, sear them first over the hot zone, then move them to a cooler section of the grill grate, away from direct intense heat, covering them if possible. This allows for slow, even cooking that ensures tenderness and juiciness.
Creative Fire Pit Recipes
Think beyond just grilling hot dogs!
- Skewered Delights: Skewers are incredibly versatile. Beyond marshmallows, try threading pieces of pre-cooked sausage with bell peppers and onions, or even twisting crescent roll dough around a stick to bake over the embers for fresh bread.
- Ember-Roasted Vegetables: Potatoes, sweet potatoes, and onions can be wrapped in foil and buried directly in the hot embers until tender. This method yields a wonderfully smoky and tender result.
- Pizza: With a flat cast iron griddle or a specialized pizza stone on a grill grate, you can achieve crispy crust pizzas, given careful heat management.
Tips for a Successful and Enjoyable Fire Pit Cooking Experience
Making fire pit cooking a consistently enjoyable part of your outdoor routine involves a few practical habits.
- Prep Food Indoors Beforehand: Do as much chopping, seasoning, and mixing as possible in your kitchen. This minimizes time spent near the fire, streamlines the cooking process, and helps maintain food safety.
- Maintain the Fire and Adjust Heat: A good fire pit cook is always aware of their heat. Keep an eye on the embers, adding small pieces of wood as needed to maintain consistent heat, and don’t hesitate to use your poker to shift coals for different temperature zones.
- Let Meat Rest: After grilling, allow meats to rest for 5-10 minutes off the heat before slicing. This allows the juices to redistribute, resulting in a more tender and flavorful outcome.
- Clean Up After Each Use: Once the fire is completely out and the pit and grates have cooled, clean them thoroughly. Remove ash, scrub grill grates, and wipe down cast iron cookware. Proper cleaning prevents rust and ensures your equipment is ready for the next adventure.
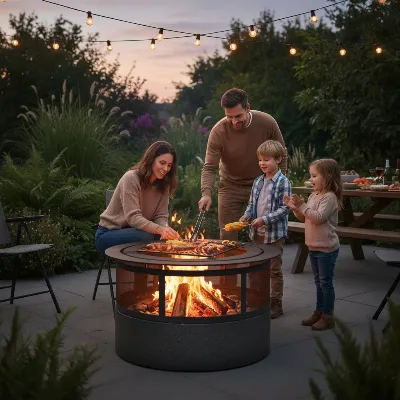 A family enjoying safely cooking and eating around a backyard wood-burning fire pit at dusk.
Conclusion
Cooking over a wood-burning fire pit at home offers a truly unique and rewarding culinary experience, connecting us to age-old traditions while creating new memories. By prioritizing safety through careful site selection, diligent fire management, and smart food handling, you can mitigate risks and focus on the joy of the process. Understanding the nuances of wood selection, mastering ember control, and utilizing the right tools will transform your backyard into a versatile outdoor kitchen. Embrace the crackle, savor the smoke, and experiment with flavors that only an open flame can provide. Are you ready to ignite your next delicious outdoor adventure?
Frequently Asked Questions
Can I use any fire pit for cooking?
No, not all fire pits are suitable for cooking. Some are purely decorative. For safe and effective cooking, choose a fire pit designed with a built-in grill, or one that can accommodate a sturdy, aftermarket cooking grate, tripod, or hanging grate system.
How do I know when the fire is ready for cooking?
The fire is ready for cooking when the flames have largely died down, leaving a glowing bed of red-orange coals and embers with minimal smoke. This usually takes 30-60 minutes after lighting. You can test the heat by holding your hand 8 inches above the embers; if you can only hold it there for 3-4 seconds, it’s hot enough for searing.
What kind of wood should I absolutely avoid?
Avoid softwoods like pine, fir, and cedar, as they burn quickly, produce excessive smoke and resin, and can impart unpleasant flavors to food. Also, never use treated lumber, painted wood, or any wood that has been chemically altered, as burning these can release toxic fumes. Always use clean, seasoned hardwoods.
How far should a fire pit be from my house?
Your fire pit should be placed at least 10 feet (approximately 3 meters) away from your house, any other structures, fences, trees, shrubs, or any combustible materials. This safe distance helps prevent accidental fires from sparks or radiant heat.
What should I do if a flare-up occurs?
If a flare-up occurs, do not use water directly on a grease fire, as this can spread the flames. Instead, if possible and safe, gently move the food away from the direct flames using long tongs. You should always have a bucket of sand or a fire extinguisher nearby to smother or extinguish the flames if they become unmanageable. Never leave the fire unattended.