Imagine crisp evenings spent under the stars, the gentle crackle of a fire, and the warmth of good company right in your backyard. A fire pit is more than just a place to burn wood; it’s a focal point for connection, relaxation, and extending your outdoor living season. While many pre-made options come with a hefty price tag, building your own DIY stone fire pit allows for incredible customization and significant savings. This guide will walk you through creating a beautiful, functional, and affordable stone fire pit that will be the envy of your neighborhood without breaking the bank.
What is a Fire Pit and Why Do You Need One?
At its core, a fire pit is an outdoor structure designed to safely contain a fire, providing warmth, light, and a captivating ambiance. While they can range from simple metal bowls to elaborate built-in gas features, a stone fire pit typically refers to a structure constructed from natural stone, concrete pavers, or retaining wall blocks. Choosing to build one yourself not only saves money but also offers the satisfaction of a handmade addition to your outdoor space.
The benefits of owning a fire pit are abundant. It instantly transforms your patio or backyard into an inviting social hub, perfect for entertaining friends, roasting marshmallows with family, or simply unwinding after a long day. A well-placed fire pit can also enhance your home’s aesthetic appeal and even boost its property value, making your backyard a true extension of your living space. Before you begin, consider crucial factors like location, size, materials, and local regulations to ensure a safe and enjoyable experience.
Popular Fire Pit Types on the Market
While the core of our project is a stone structure, fire pits are largely categorized by their fuel source. Understanding these types helps you appreciate the versatility of a stone enclosure.
Wood-Burning Stone Fire Pits
Wood-burning fire pits are the quintessential choice for those seeking an authentic campfire experience. Built with a sturdy stone exterior, they harness the natural beauty and warmth of burning logs.
- Pros: They offer a genuine crackling fire, a comforting aroma, and a deeply traditional ambiance. DIY wood-burning stone pits are generally the most budget-friendly to construct.
- Cons: These pits require a consistent supply of firewood, produce smoke, and offer less precise temperature control compared to gas options. Cleanup involves managing ash.
- Safety Notes: Always use dry, seasoned firewood. Ensure your pit has proper ventilation and is situated a safe distance from any flammable structures or overhanging branches.
|
Our Picks for the Best Fire Pit in 2026
As an Amazon Associate I earn from qualifying purchases.
|
||
| Num | Product | Action |
|---|---|---|
| 1 | Fire Beauty Fire Pit for Outside Wood Burning,BBQ Grill Steel Fire Bowl with Spark Screen Cover,Log Grate,Poker for Camping Beach Bonfire Picnic Backyard Garden |

|
| 2 | Fire Beauty 26" Steel Fire Pit with Grill & Diamond Mesh Design,360° Airflow Tech for 80% Less Smoke,XL Flames,Heavy-Duty Portable Outdoor Fire Bowl for Camping, Backyard, Beach (22lbs, 4 Handles) |
|
| 3 | BALI OUTDOORS Fire Pit with Poker, 32 inch Outdoor Fire Pit Patio, Wood Burning Firepits for Outside with Grill |
|
| 4 | Fire Pit - 32-Inch Outdoor Wood Burning Firepit with Screen, Poker, and Cover - Outdoor Fire Pits for Backyard, Deck, or Patio by Pure Garden (Black) |
|
| 5 | HGD 20 Inch Smokeless Firepit with Grill, Portable Wood Burning Fire Pit for Camping & Backyard, Stainless Steel Outdoor Fireplace with Travel Bag, Easy Setup & Compact Storage - Foldable Design |
|
| 6 | Fire Pit - 32-Inch Outdoor Wood Burning Firepit with Screen, Poker, and Cover - Outdoor Fire Pits for Backyard, Deck, or Patio by Pure Garden (Black) |
|
| 7 | Kingson 26" Outdoor Fire Pit with Grill & Mesh Cover, Wood Burning Steel Firepit with Poker & Star Spark Screen, Heavy Duty Patio Fire Bowl for Backyard, Camping & Garden |
|
| 8 | CIAYS Smokeless Firepit, 19 Inch Fire Pit for Camping with Patented Technology, Portable Fire Pit for Outside with Steel Grill Rack, Fire Poker, and Bag, Easy Setup and Storage, Wood Burning |
|
| 9 | SINGLYFIRE 36 Inch Fire Pits for Outside Large Outdoor Wood Burning Crossweave firepit Heavy Duty Steel Bronze Bonfire Pit for Patio Backyard Garden with BBQ Grate,Spark Screen,Log Grate,Poker |
|
| 10 | Wisteria Lane 3 in 1 43" Extra Large Fire Pit for Outside Wood Burning with 2 Adjustable Grills, Outdoor Fireplace with Lid and Fire Poker, BBQ & Bonfire & Round Metal Table for Patio, Backyard |
|
Gas Fire Pits (Stone Enclosed)
For convenience and cleanliness, a gas fire pit, often enclosed within a decorative stone structure, is an excellent alternative. These typically use natural gas or propane as fuel.
- Pros: Gas fire pits ignite instantly, offer easy temperature adjustments, and produce virtually no smoke or ash.
- Cons: The initial setup cost can be higher due to gas line installation (often requiring professional help) or the need for propane tank storage. Ongoing fuel costs can also be a factor.
- Safety Notes: Proper ventilation within the stone enclosure is critical. Always consult local codes and consider professional installation for gas lines to ensure safety.
Charcoal Fire Pits (Stone Enclosed)
Charcoal fire pits, enclosed by stone, are often favored for their cooking capabilities, providing a consistent heat source for grilling or barbecuing.
- Pros: They are highly effective for outdoor cooking and use readily available, inexpensive charcoal.
- Cons: Like wood, charcoal produces ash and some smoke, and precise temperature control can be challenging. Burn time is also generally shorter than wood.
- Safety Notes: Use only appropriate charcoal and ensure the pit has good airflow. Always dispose of hot ash safely and away from combustibles.
Comparing Fire Pit Types
When considering a DIY fire pit, especially a stone one, understanding the differences between fuel types can help you make an informed decision based on your priorities for cost, convenience, and ambiance.
| Feature | Wood-Burning Stone Fire Pit (DIY) | Gas Fire Pit (Stone Enclosure) | Charcoal Fire Pit (Stone Enclosure) |
|---|---|---|---|
| Cost (DIY) | Low to Moderate ($200-$600) | Moderate to High ($400-$3,000+) | Low ($150-$400) |
| Durability | High (with proper materials) | High | High |
| Ease of Use | Moderate (fire starting/managing) | High (instant on/off) | Moderate (ash, temperature) |
| Safety | Requires diligence (sparks, smoke) | Generally safer (no sparks/ash) | Requires diligence (ash disposal) |
| Smoke/Ash | Yes | Minimal/None | Yes |
| Ambiance | Authentic, crackling fire | Clean flame, modern feel | Good for cooking, less visual flame |
| Fuel Source | Logs, kindling | Natural gas or propane | Charcoal briquettes/lump |
Top Fire Pit Materials for Budget DIY
Building a stone fire pit on a budget means making smart choices about your materials. The key is to select items that are both affordable and suitable for enduring high temperatures.
Concrete Pavers/Retaining Wall Blocks
These are arguably the most popular and budget-friendly choice for a DIY stone fire pit’s exterior. They are widely available at home improvement stores.
- Description: Concrete pavers and retaining wall blocks come in a variety of sizes, shapes, and colors, allowing for diverse design options. Trapezoidal blocks are ideal for creating a perfectly circular pit, while rectangular ones work well for square or rectangular designs.
- Pros: They are relatively inexpensive, easy to handle and stack, and provide a clean, finished look.
- Cons: Standard concrete blocks are not designed for direct exposure to intense heat and can crack or spall. It is crucial to use a fire-resistant liner (like a steel fire ring or fire bricks) on the interior to protect the structural integrity of your pavers.
- Cost: Expect to spend approximately $150-$300 for the blocks needed for an average-sized fire pit.
Natural Stone (Limestone, Fieldstone)
For a rustic, organic aesthetic, natural stone can be a beautiful and sometimes very affordable option, especially if you can source it locally.
- Description: Stones like limestone or fieldstone can blend seamlessly into natural landscapes, offering a timeless appearance.
- Pros: Provides a unique, earthy look and is inherently durable. If sourced from your own property or a local quarry, the cost can be minimal.
- Cons: Natural stone is heavier and can be more challenging to work with, requiring careful selection for stacking. Critically, avoid river rocks or stones found near water, as trapped moisture can cause them to explode when heated. Always ensure your chosen natural stone is dense and non-porous.
- Cost: Highly variable. Potentially free if collected, or moderate if purchased from a landscape supplier.
Fire Bricks (for Interior Lining)
Regardless of your exterior material, fire bricks are an essential component for the interior of any wood-burning stone fire pit.
- Description: Also known as refractory bricks, these specialized bricks are designed to withstand extremely high temperatures without cracking or deteriorating.
- Pros: Fire bricks provide crucial insulation and protection for your outer decorative stones, significantly increasing the safety and longevity of your fire pit.
- Cons: They add to the overall material cost and require careful placement and often a refractory mortar.
- Cost: Budget an additional $50-$100 for fire bricks, depending on the size of your pit.
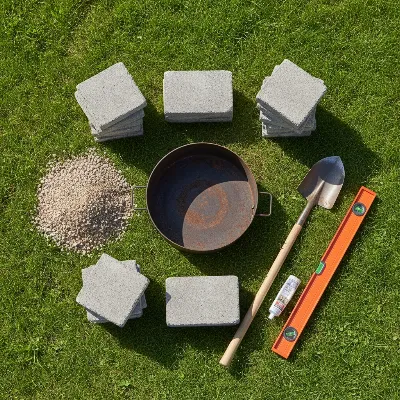 A collection of affordable materials for building a DIY stone fire pit, including pavers, gravel, and a metal fire ring, laid out on a lawn.
Your DIY Fire Pit Buying Guide
Embarking on a DIY fire pit project requires thoughtful planning to ensure both functionality and safety. This buying guide will help you make informed decisions about your needs and materials.
Defining Your Needs and Space
Before you buy a single block, clarify what you want your fire pit to be.
- Purpose: Are you envisioning intimate gatherings, large parties, casual s’mores sessions, or serious outdoor cooking? Your primary purpose will influence the size and any additional features you might need, such as a cooking grate.
- Outdoor Space: Measure the area where you plan to install your fire pit. A crucial safety guideline dictates that your fire pit should be at least 10 feet away from any structures, fences, trees, low-hanging branches, or other flammable materials. Also, check your local municipal codes and homeowners’ association (HOA) guidelines for specific restrictions on fire pit size, placement, or burning regulations.
- Portability vs. Fixed: DIY stone fire pits are typically fixed structures. If you need something movable, consider a lighter, pre-made metal fire bowl, which can still be surrounded by decorative stone for a custom look.
Choosing Materials and Size
The longevity and safety of your fire pit depend heavily on the materials you choose and how you size it for your space.
- Materials: Prioritize materials that can withstand high heat. For the exterior, concrete pavers or retaining wall blocks are excellent budget options. For the interior, fire bricks or a dedicated metal fire pit ring are essential to protect the outer structure from direct flame. For the base, a few inches of crushed gravel or lava rock will provide drainage and a non-flammable foundation. Absolutely avoid using river rocks or pea gravel directly inside the fire pit, as they can retain moisture and explode when heated.
- Size: Most fire pits range from 3 to 4 feet in diameter. Consider the number of people you typically expect to gather around it. A 3-foot diameter pit is perfect for smaller groups, while a 4-foot or larger pit accommodates more people. If building a circular pit, trapezoidal blocks will fit together more snugly, minimizing gaps.
Safety First: Key Considerations
Safety cannot be overstated when building and using a fire pit.
- Location, Location, Location: Reiterate the 10-foot rule from any combustible structures or vegetation.
- Stable, Non-Flammable Base: Your fire pit must sit on a level, stable, and entirely non-flammable surface. This usually means a compacted gravel base, a concrete pad, or solid stone.
- Call Before You Dig: Before any excavation, always call 811 (in the U.S.) to have underground utility lines marked. This free service prevents accidental damage to gas, water, or electrical lines.
- Spark Screen: A mesh spark screen or dome is a wise investment to contain embers and sparks, especially in windy conditions or areas prone to dry vegetation.
- Emergency Preparedness: Keep a fire extinguisher, a bucket of water, or a garden hose readily accessible whenever the fire pit is in use.
- Local Regulations: Verify local burning laws, which may include restrictions on burning times, materials, or require specific permits.
Building Your Budget-Friendly Stone Fire Pit (Step-by-Step)
Constructing a DIY stone fire pit is a rewarding project that can be completed in a weekend. Follow these steps to create your backyard oasis.
Site Preparation
A solid foundation is key to a durable and safe fire pit.
- Select Your Location: Reconfirm your chosen spot adheres to all safety guidelines (at least 10 feet from structures, no overhanging branches). Remember to call 811 before digging.
- Mark and Outline: Use a stake, a string, and spray paint or a garden hose to accurately mark the desired diameter of your fire pit. A common size is 36-48 inches for the outer diameter.
- Excavate: Dig a shallow, circular trench about 6-8 inches deep and slightly wider than the blocks you plan to use for the first course. This will help embed the first layer for added stability.
- Base Layer: Fill the excavated trench with 2-3 inches of paver base or crushed gravel. Use a hand tamper to compact it thoroughly, ensuring it’s level. This critical step provides drainage and a stable foundation for your blocks.
Laying the Stone Courses
This is where your fire pit begins to take shape. Precision and patience are valuable here.
- First Course: Begin laying your first layer of paver blocks or stones directly on the leveled base. Ensure each block is snug against its neighbor and perfectly level using a standard level. A rubber mallet can help gently tap blocks into place.
- Adhesive (Optional but Recommended): For enhanced stability and longevity, apply a bead of high-strength landscape construction adhesive between each layer of blocks. This prevents shifting and reinforces the structure.
- Subsequent Courses: Continue stacking layers, rotating the blocks slightly with each course (also known as staggering the joints) for a stronger bond and a more aesthetically pleasing look. Continuously check for levelness both horizontally and vertically as you build. Most fire pits are 3-4 courses (layers) high.
Interior Lining and Finishing
Protecting your outer stone structure from direct heat is crucial for safety and durability.
- Metal Fire Ring (Highly Recommended): If your budget allows, a steel fire pit insert (often called a fire ring) is the simplest and most effective way to line your pit. Place it inside your completed stone structure. Ensure there’s a small gap (1-2 inches) between the metal ring and the stone to allow for heat expansion.
- Fire Bricks (Alternative/Addition): If not using a metal ring, meticulously line the inside walls of your stone structure with fire bricks. You can mortar these together with refractory mortar for a permanent, heat-resistant barrier that protects the outer decorative stones from intense heat.
- Bottom Fill: Once the walls are complete, fill the base of the pit with a few inches of fire-rated lava rocks or crushed gravel. This layer provides additional drainage, helps distribute heat evenly, and protects the ground beneath.
- Final Checks: Step back and inspect your work. Ensure all stones are secure, the pit is level, and the surrounding area is clear of any debris or flammable materials.
Tips for Using and Maintaining Your Fire Pit
Once your budget-friendly stone fire pit is built, a few practices will ensure safe enjoyment and long-lasting beauty.
- Starting a Fire: Always use dry, seasoned firewood and natural kindling. Avoid burning trash, treated wood, or leaves, as these can produce toxic fumes and excessive smoke. Never use gasoline, lighter fluid, or other accelerants to start or rekindle a fire.
- Fire Management: Keep your fires contained and manageable. Resist the urge to overload the pit with too much wood, which can lead to larger, less controlled flames and excessive sparks. A smaller, steady fire is safer and more enjoyable.
- Safety During Use: Never leave a burning fire pit unattended, even for a moment. Establish clear boundaries for children and pets, ensuring they maintain a safe distance. Always have your emergency tools (fire extinguisher, water bucket, or hose) within easy reach.
- Cleaning: Allow the fire pit to cool completely before attempting any cleanup. Once cool, remove ash and debris. A small shovel and bucket are useful for this task.
- Maintenance: Regularly inspect your fire pit for any signs of cracking or shifting in the stones or mortar. Reapply landscape adhesive if needed. To protect your investment from weather and extend its life, consider using a durable fire pit cover when not in use.
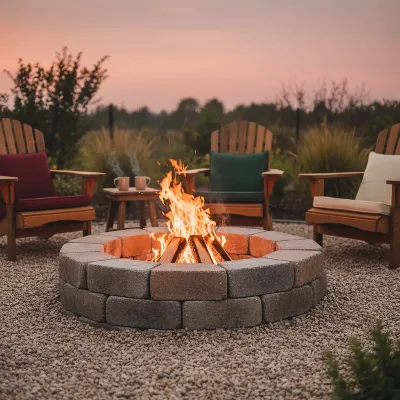 A beautifully lit DIY stone fire pit at night with a roaring fire, surrounded by comfortable seating, showcasing an inviting ambiance.
Conclusion
Building a DIY stone fire pit on a budget is more than just a home improvement project; it’s an investment in countless memorable evenings. By carefully planning, choosing affordable yet durable materials, and following safety guidelines, you can transform your backyard into an inviting oasis without breaking the bank. The satisfaction of crafting your own outdoor gathering spot, combined with the warmth and ambiance it provides, is truly priceless. So, gather your materials, roll up your sleeves, and start planning your outdoor haven today! What memories will you create around your new fire pit?
Frequently Asked Questions
How much does a DIY stone fire pit cost?
A DIY stone fire pit, particularly one made with concrete pavers or retaining wall blocks, can typically cost between $200 and $600 for materials. This is significantly more affordable than professionally installed options or high-end pre-made units.
What kind of stones should I use for a fire pit?
For the exterior, concrete pavers, retaining wall blocks, or dense natural stones like limestone are excellent choices. Crucially, the interior should be lined with fire bricks or a heavy-gauge steel fire pit insert to safely contain the flames and protect the outer structure.
What should I put at the bottom of a fire pit?
You should place a few inches of crushed gravel or fire-rated lava rocks at the bottom of your fire pit. This layer provides essential drainage and helps protect the ground beneath from intense heat. Avoid river rocks or pea gravel, as they can explode when heated.
How far should a fire pit be from a house?
For safety, a fire pit should always be located at least 10 feet away from any structure, including your house, fences, sheds, and any overhanging trees or flammable vegetation. Always check local fire codes for specific distance requirements.